A collection of tips for more generator projects:
Dual Alternators on One Engine
Q: Is it possible to run two alternators off the same engine?
A: Yes and no.
 This question comes up most of the time from folks who want more DC power than a single alternator can provide, and they hope to combine the outputs of the alternators. Not a good idea folks! The alternators we recommend have an internal voltage regulator and need to "sense" the commanded voltage at the battery to determine if the voltage is too low or two high in order to control the charge output. The only possible way to use two alternators would be to connect the alternator outputs to separate and isolated battery banks for charging and then combine the banks when it's time to withdraw power through high power diodes.
However, several customers have had special requirements for running alternators of different voltages to different battery banks, also of different voltages.
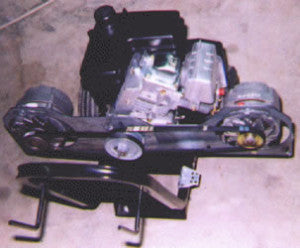
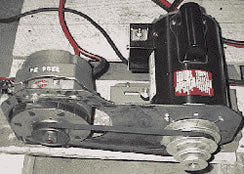
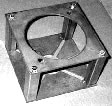
Take the situation in the photo above above, for example: Shown here is a special configuration we helped a customer define who wanted a 12 volt alternator and a 24 volt alternator to be driven from the same 5 HP engine.


The motor was a 5 HP OHV Tecumseh and two brackets: the standard horizontal shaft version to the right, and a special shorter version of the bracket to the left.
The alternator to the right is our standard 7127, 63 amp 12 volt internally regulated alternator. The alternator to the left is a specially configured internally regulated 24 volt version of the same alternator but with a dual pulley installed to make one of the extra slots line up with the extra pulley on the motor. Combined with a dual pulley installed on the motor (two of our standard 4" pulleys) and two brackets, and one each of the 30" and 37" belts offer, the system allowed the use of two alternators being driven by the same engine! (If you were to use two of the long brackets you would need 2 of the 37" belts.)
Pretty cool!
A Poor (or Resourceful!) Man's AC Powered DC Battery Charger
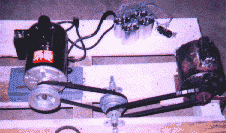
 One day, I realized that one of my Jaguar E-types had a low battery from being left in storage. And as luck would have it, I had taken the big battery charger home and there was no way to charge the battery in the old cat. It was a slow day here at TheEpicenter.com, so I had a few hours to come up with a makeshift battery charger that turned out to be so useful, I thought I would share the idea with our visitors!
For some time now we have been developing gas powered DC charging systems with great success, and have even been offering component for folks to be able to build their own. What I really needed was something I could just plug into the wall to charge a battery in a car that was buried deep in the back of the warehouse and to avoid fumes from an engine.
 What I came up with that day was a battery charger made from a 1 HP AC motor and a car alternator! Yes, having one of Epicenter's SHORT version generator brackets made it come together in no time. As luck would have it, we had a few special brackets that have a bolt pattern that fits a wider range of motors, and it came really close to fitting the bolt pattern of the front of the AC motor. In a few minutes with a file, the pattern was adapted and presto. Note: Although the short version of the bracket is shown, our longer version could be used however you would have to drill your own holes to adapt the bracket to the AC motor.
Parts Needed:
- AC Motor
- GM Alternator
- Industrial "A" Belt
- Pulley
- Bracket
Take an AC motor (1 HP or larger), an industrial "A" belt, a pulley, an alternator and one of our brackets and you have a quick and easy to put together battery charger.
The Ultimate DC Charging System - Direct Drive and Propane Powered
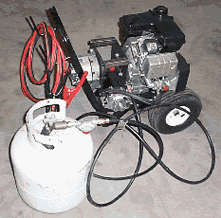 Here is an awesome project completed by one of our long-time customers. The brackets and drive couplers for this project were provided by TheEpicenter.com.
Please note that TheEpicenter.com DOES NOT OFFER or provide technical support for propane conversion kits. Please do not call with technical questions about propane conversions! Contact U.S. Carburation regarding propane conversion kits: 1-800-533-5608.
However, we do offer BRACKETS, PULLEYS, and DRIVE COUPLERS for the project.
In this project, the customer wanted to direct drive an alternator to a 5 HP motor. This was not a simple task. The first thing that was required was to have custom direct drive couplers made that would take the place of the pulley and nut on the front of a standard alternator.
The Drive Coupler
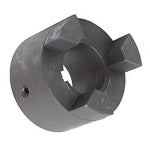 To do this, a standard coupler was bored out and threaded with the correct threads to fit the alternator (we had to have a custom tap made at a die and tool company at a cost of several hundred dollars).
Then we had to counter bore the adapter to fit the non threaded section of the alternator shaft . But the cool thing is, we are now able to offer them to our customers. (Note that this adapter only fits GM small frame alternators like the ones available at TheEpicenter.com.)
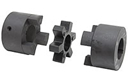 To complete the coupler, you then select the size that fits your motor shaft. The combination of the special alternator coupler (shown at left), a rubber spider (shown at right), and the motor shaft coupler works to transfer rotational energy from the motor to the alternator shaft.
Direct Drive Mounting Assembly
 The next thing to do was to come up with a way to mount the direct drive system to the engine. Not an easy task to say the least. To make a long story short, we needed two plates. (Shown here at the left is the complete assembly.) One plate had to mount to the engine (the plate on the bottom). That plate has mounting slots such that it can fit all engines with bolt circles smaller or equal to 7.5 inches. This covers everything from 3 HP to 20 HP.
Now, here is the trick. Notice from the picture that there are spacers and bolts connecting the two plates. Well, nuts had to be welded to the side of the motor plate that faces away from the motor. This was done so that the surface of the plate that touches the motor could be free of obstructions. The spacer tubes then need to be large enough in diameter that they can sit over the nuts (the nuts sit inside the tubes). In the example shown, we used square tube for the spacers but we have also used 3/4 electrical conduit for the spacers. The length of the bolts and the length of the spacers must be determined at the time of assembly; knowing the exact length of the motor shaft is crucial to make certain the bolts are long enough to go through the spacers into the welded nuts without being so long that they go through the nuts and touch the engine case. The length of the spacers is also critical in setting the space between the shaft couplers for the rubber spider.
Note that we do have direct drive bracket sets available at TheEpicenter.com, but you will need to determine the length of, and make your own spacers and get your own bolts. The brackets do have the nuts welded in place for you.
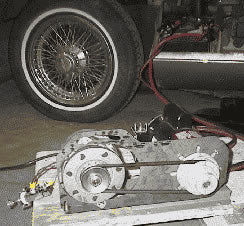
Pressure Washer Cart Used for Mounting
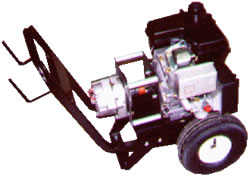 The last task is to come up with a way to mount the system. What we used was a pressure washer cart. One thing to note: This is a charging system and not a generator. So, it has to be connected to a battery to make a complete system. Connect a DC to AC power inverter and you can then get AC out of the system, but the battery is not shown.
I guess someone could make brackets to hand a battery off the back of this to make it a more complete system, but the intent of this project was to be able to have a very mobile charging system to charge batteries at a stationary location (not to carry the batteries with the system).
Now some final notes on the direct drive model. Use a 94 amp alternator. At idle (about 1700 RPM) the alternator is able to output about 20 amps. Crank up the RPM to full throttle (3600 RPM) and it will do about 70 amps. Our first attempt was with a 63 amp alternator and the 5 HP motor was happy to keep running even as we overloaded the alternator and smoked the diodes. So, use a 94 amp alternator and you will have a bit of reserve at 3600 RPM (to put out more than 70 amps the alternator would actually need to turn faster than the motor can go so it's like having a built in safety governor).
An Improved Mounting Scheme
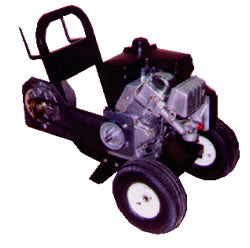 You might also remember that our first project mounted the motor and other items on a plywood base. Shown here, the motor can also be mounted to a pressure washer cart like the direct drive project above. The downside of this configuration is that the pressure washer cart does not have holes drilled for mounting the motor with the shaft out the side, just front and back. Drilling a few holes is a small price to pay for a quick and easy cart though.
The addition of a DC to AC power converter allows 120 Volt AC devices to be powered by the batteries the system can charge.
Wiring it up
The wiring depends on which alternator you choose. All three alternator types are shown.
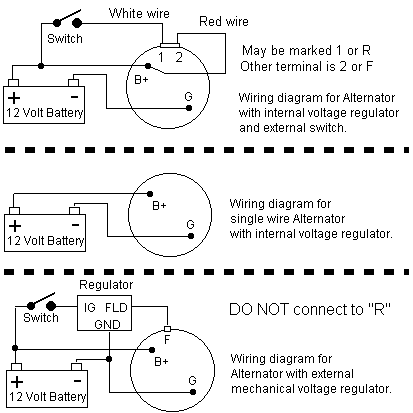
Do not wire the alternator unless you are sure about what type you are using. If you make a mistake in the selection of the alternator or wiring diagram, you run a very high risk of damaging your battery, electronic devices, or worse yet causing personal injury! Consult a parts professional for additional information!
This article is intended for educational purposes only. No guarantees are expressed or implied as to the accuracy of information presented here! Consult with an automotive wiring expert before attempting to carry out any wiring.
One final note
If you are using an alternator that requires an external switch, you will need to turn off the switch prior to attempting to start the generator. Once the motor is running, the switch can be set to the on position.
Special parts used in many of our power related tips are available here at TheEpicenter.com!
- Parts needed for the Horizontal Shaft Generator Project
- Parts needed for the Vertical Shaft Generator Project
- Parts needed for the Direct Drive Generator Project